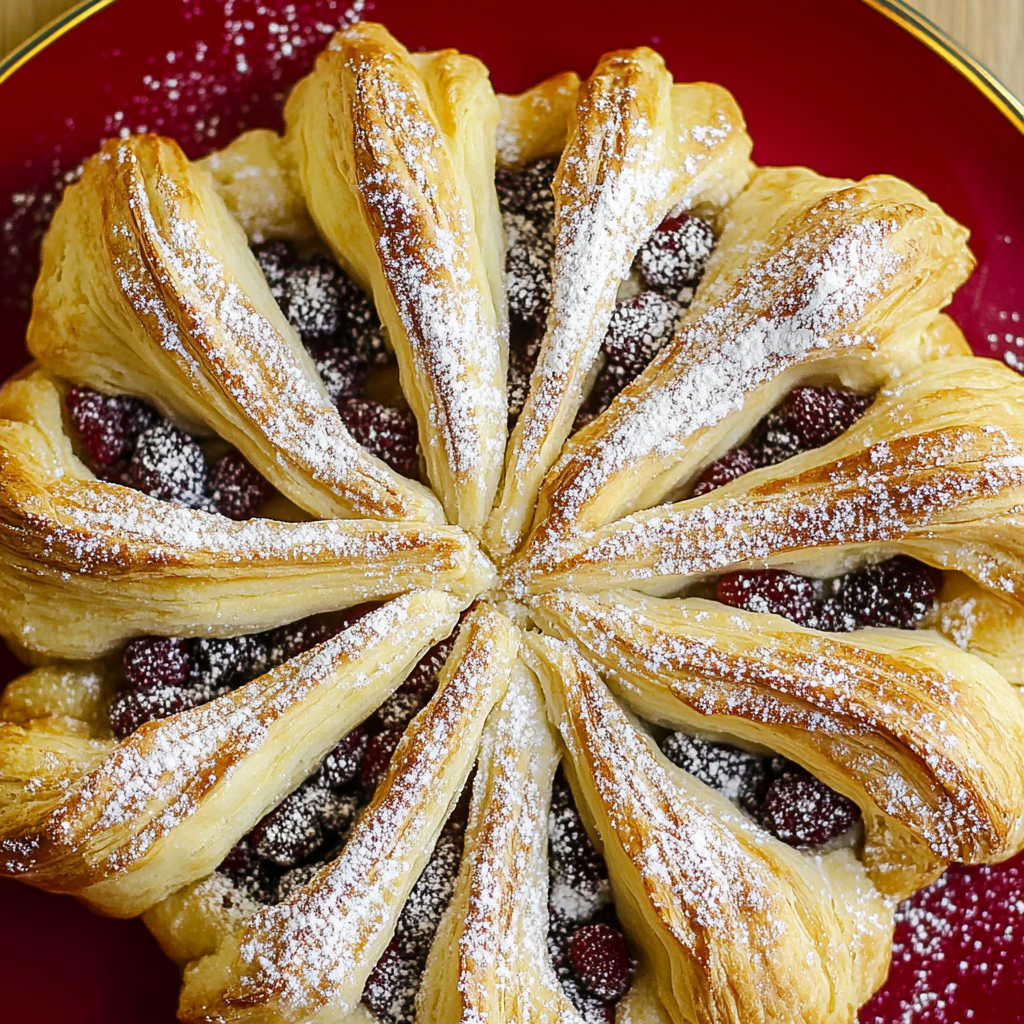
Easy Puff Pastry Snowflake
If you’re looking for a delightful dessert that’s sure to impress, the Easy Puff Pastry Snowflake is just what you need! This charming recipe transforms simple ingredients into a stunning treat that feels festive for any occasion. Whether it’s a cozy family gathering or a busy weeknight, this dessert comes together quickly and brings smiles all around. Plus, who can resist the flaky layers of pastry filled with delicious chocolate or sweet jam?
What makes this snowflake special is not just its beautiful presentation but also how easy it is to whip up. You’ll find yourself reaching for this recipe again and again!
Why You’ll Love This Recipe
- Quick and Easy: With just four main ingredients, you can create this stunning dessert in no time!
- Family-Friendly: Kids love to help twist the pastry, making it a fun activity for everyone.
- Versatile Flavors: Use Nutella for a rich chocolate experience or your favorite jam for a fruity twist.
- Beautiful Presentation: The snowflake shape makes it perfect for celebrations or just a sweet surprise at home.
- Make-Ahead Option: Prepare it ahead of time and bake just before serving for fresh, warm goodness.
Ingredients You’ll Need
You’ll be pleasantly surprised by how simple these ingredients are! They’re wholesome and readily available, making it easy to bring the magic of an Easy Puff Pastry Snowflake right into your kitchen.
For the Pastry
- All-purpose flour, for dusting work surface
- 1 (17.3-oz.) package frozen puff pastry (2 sheets), thawed
For the Filling
- 1/3 cup Nutella or jam
For the Egg Wash
- 1 large egg, beaten with 1 Tablespoon water
For Topping
- Crystal sanding sugar, for topping (optional)
- Confectioners’ sugar, for dusting
Variations
This Easy Puff Pastry Snowflake is incredibly flexible, allowing you to customize it to your taste!
- Change Up the Filling: Swap Nutella for your favorite fruit jam or even almond butter for a nutty flavor.
- Add Some Spice: Sprinkle in some cinnamon or nutmeg with the filling for an extra layer of warmth.
- Go Savory: Use cheese and herbs instead of sweet fillings for a delightful appetizer version!
- Make It Mini: Create smaller snowflakes using cookie cutters instead of circles for cute bite-sized treats.
 How to Make Easy Puff Pastry Snowflake
Step 1: Preheat Your Oven
First things first, preheat your oven to 400°F and line a baking sheet with parchment paper. This ensures your puff pastry will bake evenly while keeping things tidy.
Step 2: Prepare Your Work Surface
Lightly flour your work surface to prevent sticking. Unfold both sheets of puff pastry and give them a gentle roll with your rolling pin to seal any perforations. This step helps create those lovely layers when baked!
Step 3: Shape Your Base
Cut each sheet into a 9-inch circle—tracing around a large bowl works great! Place one circle on the lined baking sheet as the base of your snowflake.
Step 4: Add Your Filling
Spread Nutella or jam in the center of that first puff pastry circle. Don’t forget to leave about a half-inch border around the edges. This creates room for sealing later on!
Step 5: Seal It Up
Carefully place the second puff pastry circle on top of the filling. Press down lightly around the edges to seal them together—this keeps all that deliciousness inside while baking.
Step 6: Cut Your Wedges
Now comes the fun part! Place a glass or small bowl in the center as a guide. Use a sharp knife or pizza wheel to cut from the edge outward into 16 wedges around the circle. This creates those lovely points of your snowflake.
Step 7: The Egg Wash
Remove that guiding glass and brush the top of your pastry with egg wash. This helps achieve that golden-brown color we all crave!
Step 8: Twist It Up!
Taking two wedges at a time, twist them toward each other and pinch them together at their tips. Repeat this until all wedges are twisted and sealed—look at how beautiful they start to shape up like real snowflakes!
Step 9: Bake to Perfection
If you want some sparkle, sprinkle sanding sugar over top before popping it into the oven. Bake until golden brown and puffed—this usually takes about 20 to 25 minutes.
Step 10: Cool & Dust
Once out of oven glory, let your pastry cool slightly before dusting it with confectioners’ sugar. It’s now ready to serve and enjoy!
Step 11: Share Your Creation!
Did you make this recipe? Don’t forget to give it a star rating below! I’d love to hear how your Easy Puff Pastry Snowflake turned out!
Pro Tips for Making Easy Puff Pastry Snowflake
Creating a stunning Easy Puff Pastry Snowflake is not only simple but also rewarding when you follow a few helpful tips!
- Thaw Properly: Make sure your puff pastry is completely thawed before rolling it out. This ensures that it rolls out smoothly and puffs up beautifully in the oven.
- Keep It Cold: If your puff pastry starts to get too warm while working with it, pop it back into the fridge for a few minutes. Keeping the dough cold helps achieve that flaky texture we all love!
- Use Even Pressure: When rolling out your pastry, apply even pressure to avoid uneven thickness. This will help ensure that all parts of your snowflake bake uniformly, giving you a beautiful golden finish.
- Experiment with Fillings: While Nutella or jam are fantastic choices, feel free to get creative! Try different spreads like almond butter, or even a savory filling for a unique twist on this festive treat.
- Don’t Skip the Egg Wash: Brushing the snowflake with egg wash not only gives it a shiny, golden appearance but also helps any toppings adhere better. It’s an essential step for that perfect finish!
How to Serve Easy Puff Pastry Snowflake
Once your Easy Puff Pastry Snowflake is baked and dusted with confectioners’ sugar, it’s time to present this showstopper! Here are some ideas to elevate your serving game.
Garnishes
- Fresh Berries: A handful of fresh strawberries or raspberries adds a pop of color and complements the sweetness of the pastry beautifully.
- Mint Leaves: A few sprigs of fresh mint can provide a refreshing contrast to the sweetness and enhance visual appeal.
- Drizzle of Chocolate: A light drizzle of melted chocolate over the top can take your snowflake from delightful to decadent!
Side Dishes
- Vanilla Ice Cream: Pairing your puff pastry with a scoop of vanilla ice cream creates a delicious contrast between warm and cold, making each bite an indulgent experience.
- Fruit Salad: A bright fruit salad made with seasonal fruits adds freshness and balances out the richness of the pastry.
- Hot Chocolate: For a cozy treat, serve alongside a warm cup of hot chocolate topped with whipped cream or marshmallows—it’s perfect for those chilly evenings!
- Spiced Tea: A steaming cup of spiced tea (like chai) makes for an aromatic pairing that enhances the overall flavor experience.
With these tips and serving suggestions, you’ll be ready to wow your friends and family with your Easy Puff Pastry Snowflake! Enjoy every bite and create wonderful memories together.
 Make Ahead and Storage
This Easy Puff Pastry Snowflake is a fantastic option for meal prep, making it perfect for festive gatherings or cozy family nights. You can prepare parts of the recipe ahead of time, ensuring that you have a delightful dessert ready to serve with minimal fuss.
Storing Leftovers
- Store any leftover puff pastry snowflake in an airtight container at room temperature for up to 2 days.
- If you prefer, you can keep it in the refrigerator for slightly longer freshness, but be aware that the pastry may lose some of its crispiness.
Freezing
- To freeze, wrap the cooled puff pastry snowflake tightly in plastic wrap and then place it in a freezer-safe container or bag.
- It can be frozen for up to 1 month. When you’re ready to enjoy it, simply thaw it in the refrigerator overnight.
Reheating
- To reheat, preheat your oven to 350°F (175°C).
- Place the puff pastry snowflake on a baking sheet and warm it in the oven for about 10-15 minutes until heated through. This will help restore some of its original flakiness.
FAQs
Here are some common questions about this delightful recipe!
Can I use different fillings for the Easy Puff Pastry Snowflake?
Absolutely! You can substitute Nutella with your favorite jam or even chocolate spread alternatives to customize the flavor to your liking.
How do I make my Easy Puff Pastry Snowflake look extra festive?
To enhance its appearance, consider using colorful jams or adding a sprinkle of edible glitter along with sanding sugar before baking. Dusting with confectioners’ sugar after baking also adds a lovely touch!
What should I serve with my Easy Puff Pastry Snowflake?
This dessert pairs wonderfully with fresh fruits like strawberries or raspberries. A scoop of dairy-free ice cream would also be a delicious accompaniment!
Can I make the Easy Puff Pastry Snowflake ahead of time?
Yes! You can prepare the snowflake up to the point of baking and then refrigerate it until you’re ready to bake. Just remember to brush it with egg wash before popping it into the oven!
Final Thoughts
I hope you find joy in creating this beautiful Easy Puff Pastry Snowflake! It’s not only simple but also brings a festive spirit to any gathering. Whether you’re celebrating a special occasion or just want to treat yourself, this sweet treat is sure to impress. Enjoy every flaky bite and don’t hesitate to share your creations with family and friends!
Easy Puff Pastry Snowflake
Create an Easy Puff Pastry Snowflake that will dazzle your guests and bring joy to any occasion! This delightful dessert transforms basic ingredients into a stunning visual treat with layers of flaky pastry enveloping a luscious filling of Nutella or your favorite jam. Perfect for family gatherings, holiday celebrations, or cozy weeknights, this pastry comes together in no time, making it a go-to recipe you’ll want to make again and again. With its beautiful snowflake shape and the option to customize flavors, this dessert is not only appealing but also fun to prepare with loved ones.
- Prep Time: 15 minutes
- Cook Time: 25 minutes
- Total Time: 40 minutes
- Yield: Serves 8
- Category: Dessert
- Method: Baking
- Cuisine: American
Ingredients
- All-purpose flour (for dusting)
- 1 (17.3 oz) package frozen puff pastry (2 sheets), thawed
- 1/3 cup Nutella or jam
- 1 large egg (beaten with 1 tablespoon water for egg wash)
- Crystal sanding sugar (optional)
- Confectioners’ sugar (for dusting)
Instructions
- Preheat oven to 400°F and line a baking sheet with parchment paper.
- Lightly flour your work surface; roll out the thawed puff pastry sheets gently.
- Cut each sheet into a 9-inch circle. Place one circle on the prepared baking sheet.
- Spread Nutella or jam in the center of the first circle, leaving a half-inch border.
- Place the second puff pastry circle on top; gently press edges to seal.
- Use a glass as a guide and cut the circle into 16 wedges without cutting all the way through.
- Brush the top with egg wash; twist each wedge toward each other and pinch tips together.
- Optional: Sprinkle sanding sugar before baking for extra sparkle.
- Bake for 20-25 minutes until golden brown and puffed.
- Let cool slightly, dust with confectioners’ sugar, and serve.
Nutrition
- Serving Size: 1 serving
- Calories: 210
- Sugar: 7g
- Sodium: 130mg
- Fat: 12g
- Saturated Fat: 6g
- Unsaturated Fat: 5g
- Trans Fat: 0g
- Carbohydrates: 22g
- Fiber: 1g
- Protein: 3g
- Cholesterol: 30mg