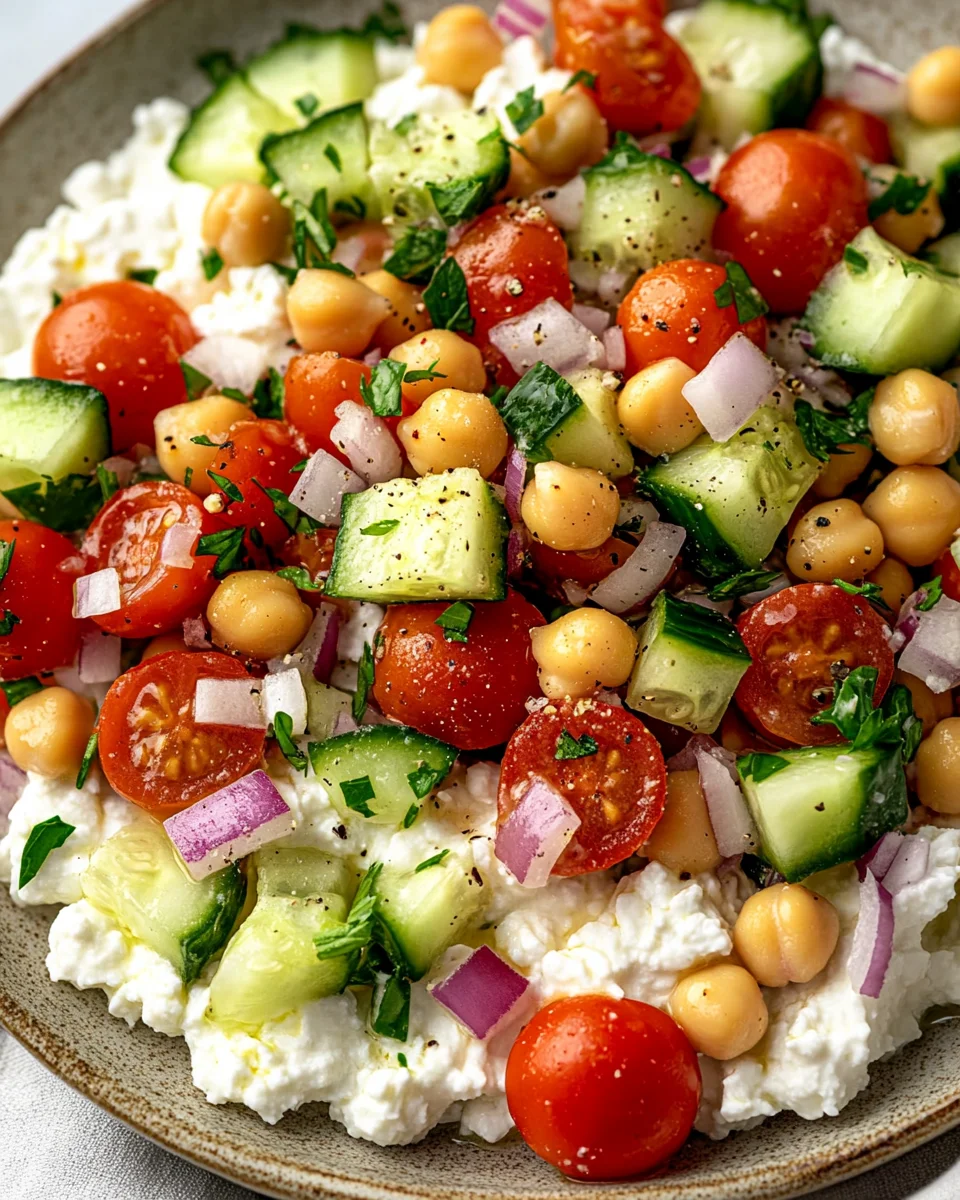
Cottage Cheese and Chickpea Salad
Enjoy a refreshing, protein-packed Cottage Cheese and Chickpea Salad made with creamy cottage cheese, hearty chickpeas, and fresh vegetables. This easy recipe is perfect for a quick lunch, light dinner, or healthy snack. In just minutes, you can whip up a nutritious dish that’s ideal for meal prep and suitable for various occasions.
Why You’ll Love This Recipe
- Quick Preparation: This salad comes together in just 10 minutes, perfect for busy days.
- High in Protein: Packed with cottage cheese and chickpeas, this salad offers a healthy protein boost.
- Versatile Flavors: Customize it with your favorite veggies or herbs to suit your taste.
- No Cooking Required: An ideal no-cook option for those warm summer days.
- Meal Prep Friendly: Make it ahead of time and store it in the fridge for easy lunches all week.
Tools and Preparation
To make the Cottage Cheese and Chickpea Salad efficiently, having the right tools on hand is essential.
Essential Tools and Equipment
- Mixing bowl
- Cutting board
- Knife
- Measuring spoons
Importance of Each Tool
- Mixing bowl: A large mixing bowl allows you to combine all ingredients without mess.
- Knife: A sharp knife makes chopping vegetables quick and safe.
- Cutting board: Provides a stable surface for cutting your ingredients cleanly.
- Measuring spoons: Ensures accurate measurements of liquids like olive oil and lemon juice.
Ingredients
Main Ingredients
- 1 cup cottage cheese
- 1 can chickpeas, drained and rinsed
- 1 cucumber, diced
- 1 cup cherry tomatoes, halved
- ¼ cup red onion, finely chopped
- 2 tablespoons fresh parsley, chopped
- 2 tablespoons lemon juice
- 1 tablespoon olive oil
- Salt, to taste
- Pepper, to taste
How to Make Cottage Cheese and Chickpea Salad
Step 1: Combine Base Ingredients
In a large bowl, combine the cottage cheese and chickpeas. Stir them together until they are well blended.
Step 2: Add Fresh Vegetables
Add the following ingredients to the bowl:
Diced cucumber
Halved cherry tomatoes
Chopped red onion
Mix gently to incorporate all the fresh flavors.
Step 3: Add Herbs and Dressing
Toss in the fresh parsley, then drizzle with:
Olive oil
Lemon juice
Step 4: Season to Taste
Season your salad with salt and pepper according to your preference.
Step 5: Mix Everything Together
Gently mix all ingredients until they are well combined. Be careful not to mash the chickpeas.
Step 6: Chill Before Serving
Place the salad in the refrigerator for about 15-20 minutes before serving. Chilling enhances the flavors!
This Cottage Cheese and Chickpea Salad is not only delicious but also a fantastic addition to any meal plan!
How to Serve Cottage Cheese and Chickpea Salad
Cottage Cheese and Chickpea Salad is versatile and can be served in various ways. Whether as a light lunch, a side dish, or an appetizer, this salad can complement any meal. Here are some serving suggestions to enhance your dining experience.
On a Bed of Greens
- Serve the salad on a bed of mixed greens for added crunch and nutrition.
In Lettuce Wraps
- Spoon the salad into crisp lettuce leaves for a fun, low-carb option that makes for great finger food.
With Whole Grain Crackers
- Pair the salad with whole grain crackers for a satisfying snack or light meal.
As a Topping for Toast
- Spread the salad over whole-grain toast or pita for a quick and filling breakfast or lunch.
With Grilled Chicken or Fish
- Use the salad as a topping on grilled chicken or fish to add flavor and protein to your main dish.
Chilled as a Dip
- Serve it chilled as a dip with vegetable sticks or tortilla chips for an easy appetizer at gatherings.

How to Perfect Cottage Cheese and Chickpea Salad
To elevate your Cottage Cheese and Chickpea Salad, consider these helpful tips. These suggestions will ensure that your dish is both delicious and nutritious.
- Choose Fresh Ingredients: Always opt for fresh vegetables to enhance flavor and texture.
- Adjust Seasoning: Experiment with different herbs like dill or basil to customize the taste according to your preference.
- Add Crunch: Incorporate nuts or seeds, such as sunflower seeds, for an extra layer of crunch.
- Marinate Before Serving: Allow the salad to chill in the fridge for at least 15-20 minutes to let the flavors meld beautifully.
- Experiment with Dressings: Try adding different dressings like balsamic vinaigrette or yogurt dressing for variety.
- Make It Colorful: Include colorful ingredients like bell peppers or shredded carrots to make the salad visually appealing.
Best Side Dishes for Cottage Cheese and Chickpea Salad
Cottage Cheese and Chickpea Salad pairs well with various side dishes that can complement its flavors. Here’s a list of delicious options to consider.
- Grilled Vegetables: A mix of seasonal vegetables grilled to perfection adds great flavor contrast.
- Quinoa Pilaf: Lightly seasoned quinoa pilaf provides additional protein and fiber while keeping the meal healthy.
- Roasted Sweet Potatoes: Sweet potatoes roasted until crispy bring sweetness that balances the salad’s savory notes.
- Hummus Platter: A variety of hummus served with pita bread enhances your Mediterranean theme while being deliciously creamy.
- Stuffed Bell Peppers: Bell peppers filled with rice, beans, or cheese make flavorful companions alongside this refreshing salad.
- Fruit Salad: A fresh fruit salad adds a sweet touch that complements the savory elements of the chickpea salad.
- Baked Falafel: Crispy baked falafel provides an additional protein source that pairs wonderfully with this dish.
- Couscous Salad: A light couscous salad with herbs and lemon can round out the meal nicely while keeping it healthy.
Common Mistakes to Avoid
Making a Cottage Cheese and Chickpea Salad can be simple, but there are common pitfalls to avoid. Here are some mistakes to watch out for:
- Skipping the seasoning: Not adding salt and pepper can make your salad bland. Always season to enhance flavors.
- Overmixing the ingredients: Mixing too much can break down the chickpeas and cottage cheese. Gently combine to maintain texture.
- Using stale vegetables: Freshness is key for flavor and crunch. Always check your produce before using it.
- Neglecting chill time: Skipping the chilling step can result in a less refreshing salad. Allow at least 15-20 minutes in the fridge.
- Ignoring customization: Sticking strictly to the recipe limits creativity. Feel free to add other veggies or spices you love.
Storage & Reheating Instructions
Refrigerator Storage
- Store in an airtight container.
- Keep in the refrigerator for up to 3 days.
Freezing Cottage Cheese and Chickpea Salad
- Freezing is not recommended due to the texture of cottage cheese.
- If you must, store in a freezer-safe container for up to 1 month.
Reheating Cottage Cheese and Chickpea Salad
- Oven: Heat at 350°F for about 10-15 minutes until warm.
- Microwave: Place in a microwave-safe dish, cover, and heat for 30-second intervals until warm.
- Stovetop: Use a non-stick pan on low heat, stirring frequently until warmed through.
Frequently Asked Questions
Here are some common queries about Cottage Cheese and Chickpea Salad:
Can I make Cottage Cheese and Chickpea Salad ahead of time?
Yes, this salad is great for meal prep! Prepare it a day in advance and keep it chilled in the refrigerator.
What can I add to my Cottage Cheese and Chickpea Salad?
You can customize your salad with ingredients like bell peppers, avocado, or olives for added flavor and nutrition.
Is this salad suitable for meal prep?
Absolutely! The Cottage Cheese and Chickpea Salad keeps well and makes a perfect healthy lunch option throughout the week.
How long will leftovers last?
Leftovers can last up to 3 days when stored properly in an airtight container in the refrigerator.
Final Thoughts
The Cottage Cheese and Chickpea Salad is not only delicious but also versatile. It’s perfect for lunch, dinner, or as a healthy snack! You can easily customize it with your favorite vegetables or herbs. Give this refreshing recipe a try, and enjoy its protein-packed goodness!
Cottage Cheese and Chickpea Salad

Experience the deliciousness of Cottage Cheese and Chickpea Salad, a refreshing and protein-packed dish that’s perfect for any meal occasion. This vibrant salad combines creamy cottage cheese with hearty chickpeas and a medley of fresh vegetables, making it an ideal choice for a quick lunch, light dinner, or healthy snack. With no cooking required, this easy recipe comes together in just minutes, making it perfect for meal prep or those busy days. Customize it with your favorite veggies and enjoy the nutritious flavors that are sure to satisfy.
- Prep Time: 10 minutes
- Cook Time: 0 minutes
- Total Time: 10 minutes
- Yield: Approximately 4 servings 1x
- Category: Salad
- Method: No cooking
- Cuisine: Mediterranean
Ingredients
- 1 cup cottage cheese
- 1 can chickpeas, drained and rinsed
- 1 cucumber, diced
- 1 cup cherry tomatoes, halved
- ¼ cup red onion, finely chopped
- 2 tablespoons fresh parsley, chopped
- 2 tablespoons lemon juice
- 1 tablespoon olive oil
- Salt and pepper to taste
Instructions
- In a large mixing bowl, combine the cottage cheese and chickpeas until well blended.
- Add diced cucumber, halved cherry tomatoes, and chopped red onion; mix gently.
- Toss in fresh parsley and drizzle with olive oil and lemon juice.
- Season with salt and pepper to taste.
- Gently mix all ingredients until combined without mashing the chickpeas.
- Chill in the refrigerator for 15-20 minutes before serving to enhance flavors.
Nutrition
- Serving Size: 1 serving
- Calories: 290
- Sugar: 6g
- Sodium: 450mg
- Fat: 10g
- Saturated Fat: 3g
- Unsaturated Fat: 7g
- Trans Fat: 0g
- Carbohydrates: 34g
- Fiber: 9g
- Protein: 18g
- Cholesterol: 10mg