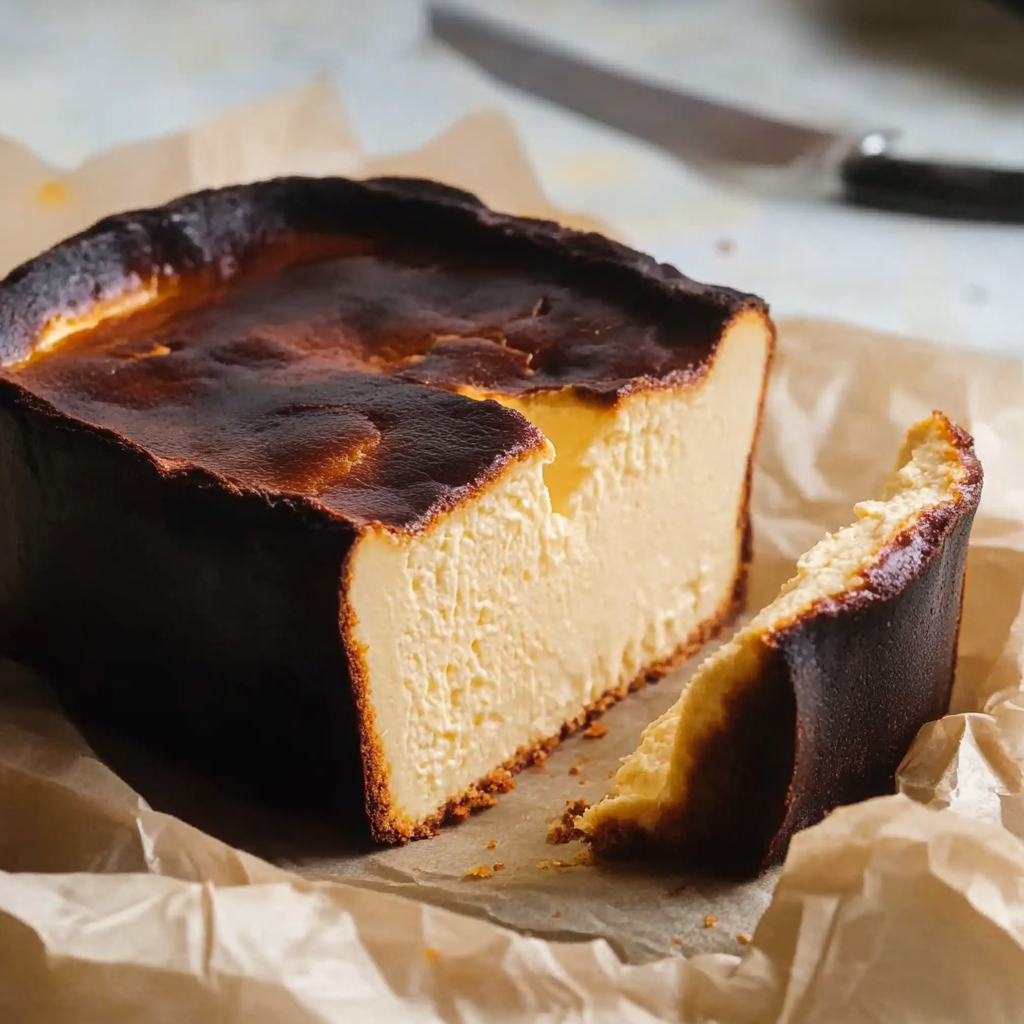
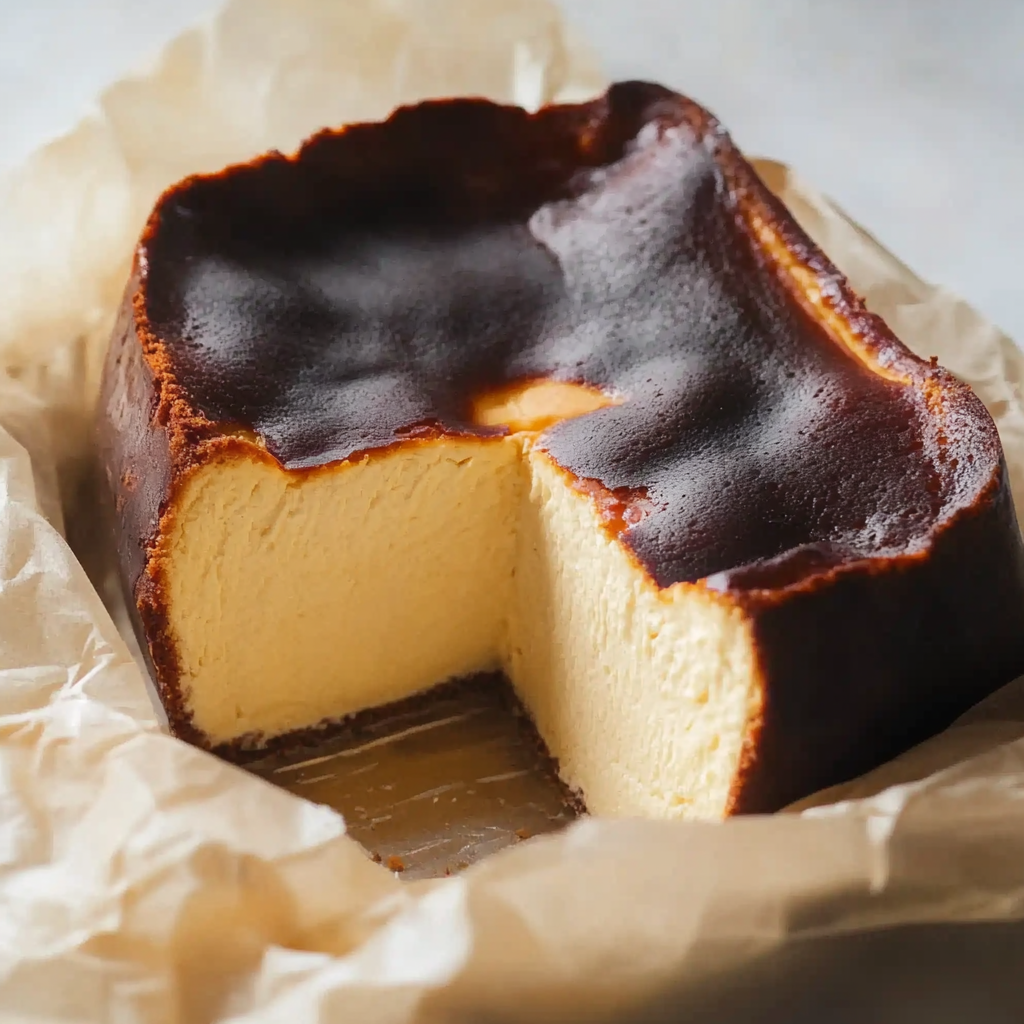
Burnt Basque Cheesecake in a Loaf Pan
If you’re looking for a delightful dessert that’s both simple and impressive, then you’ve stumbled upon the perfect recipe! This Burnt Basque Cheesecake in a Loaf Pan is a family favorite of mine. It combines a creamy texture with a beautifully caramelized top that looks as stunning as it tastes. Whether you’re hosting friends for dinner or just want to treat yourself after a long week, this cheesecake is sure to make any occasion feel special.
What I love most about this recipe is its ease! With just a handful of ingredients and minimal prep time, you can whip up this delicious cheesecake. Plus, it’s perfect for small gatherings or even as a delightful weeknight treat.
Why You’ll Love This Recipe
- Easy to make: With just 10 minutes of prep time, you’ll have this cheesecake in the oven before you know it!
- Deliciously creamy: The combination of cream cheese and heavy cream creates an indulgently smooth texture that melts in your mouth.
- Perfect for sharing: This recipe yields six generous slices, making it ideal for sharing with family or friends.
- Make-ahead friendly: You can bake this cheesecake ahead of time and let it chill overnight, so it’s ready when you are.
- Visually stunning: The burnt top adds a rustic charm that will impress anyone who sees (and tastes) it!
Ingredients You’ll Need
Let’s gather our ingredients! You’ll find that these are simple and wholesome items that you might already have in your kitchen. Each one contributes to the rich flavor and creamy texture of this lovely cheesecake.
For the Cheesecake
- 1 1/2 cups cream cheese, softened (full-fat)
- 1/2 cup granulated sugar
- 2 large eggs, room temperature
- 3/4 cup heavy cream
- 1/2 teaspoon vanilla extract
- 1/8 teaspoon salt
- 1 tablespoon all-purpose flour
Variations
One of the best things about this Burnt Basque Cheesecake is its flexibility! Feel free to get creative with these variations:
- Add some zest: Incorporate the zest of a lemon or orange for a refreshing citrus twist.
- Mix in flavors: Try adding cocoa powder for a chocolate version or swirl in some fruit puree before baking for added flavor.
- Change up the crust: While this recipe doesn’t require one, you could press some crushed cookies into the bottom of the loaf pan for added texture.
- Top it off: After chilling, serve with fresh berries or a drizzle of chocolate sauce to elevate your dessert experience.
How to Make Burnt Basque Cheesecake in a Loaf Pan
Step 1: Preheat Your Oven
Start by preheating your oven to 400°F (200°C). This high temperature is key to achieving that beautiful burnt top while keeping the center creamy. While the oven warms up, line your loaf pan with parchment paper. Leave some overhang; this will make removing the cheesecake later super easy.
Step 2: Creaming Time
In a large mixing bowl, beat together the cream cheese and sugar. Aim for a very smooth and fluffy consistency—this step is crucial because it helps create that light texture we all love in cheesecakes.
Step 3: Add Eggs
Now it’s time to incorporate the eggs. Add them one at a time, mixing well after each addition. This ensures they blend seamlessly into the mixture, leading to an even baking result.
Step 4: Pour in Cream and Flavorings
Next, pour in the heavy cream, vanilla extract, and salt. Beat everything together until fully incorporated and silky smooth. This combination adds richness and depth to our cheesecake.
Step 5: Fold in Flour
Sift in the all-purpose flour. Gently fold until just combined; overmixing here can lead to a dense texture, which we want to avoid!
Step 6: Prepare for Baking
Pour your batter into the prepared loaf pan. Give it a gentle tap on the counter; this helps release any air bubbles trapped inside.
Step 7: Bake Away
Place your cheesecake in the oven and bake for about 40–45 minutes. Keep an eye on it! You want that top to be deeply golden while ensuring the center still jiggles slightly when done.
Step 8: Chill Before Serving
Once baked, allow your cheesecake to cool at room temperature before placing it in the refrigerator. Letting it chill for at least four hours (or preferably overnight) develops those incredible flavors and makes slicing easier!
Enjoy each creamy bite of this delightful Burnt Basque Cheesecake made right in your own loaf pan!
Pro Tips for Making Burnt Basque Cheesecake in a Loaf Pan
Creating the perfect burnt Basque cheesecake is all about precision and care, so here are some tips to elevate your baking game!
- Use room temperature ingredients: Bringing your cream cheese and eggs to room temperature ensures a smoother batter, which results in a creamier cheesecake without any lumps.
- Don’t skip the parchment paper: Lining your loaf pan with parchment paper creates an easy release for your cheesecake once it’s baked. The overhang also makes it easier to lift the cheesecake out without damaging its shape.
- Monitor the baking time closely: Every oven is different, so keep an eye on your cheesecake as it bakes. You want that beautiful golden top but still a slightly jiggly center for the perfect texture.
- Cool before refrigerating: Letting your cheesecake cool to room temperature helps it set properly. Refrigerating it while still warm can lead to a soupy consistency.
- Chill overnight if possible: Allowing your cheesecake to chill overnight truly enhances the flavors and gives it time to firm up beautifully, making slicing much easier.
How to Serve Burnt Basque Cheesecake in a Loaf Pan
This delightful dessert not only tastes incredible but also looks stunning on any table. Here are some ideas for serving your burnt Basque cheesecake that will impress friends and family alike!
Garnishes
- Fresh berries: A handful of fresh strawberries or blueberries adds a pop of color and a burst of freshness that balances the rich flavors of the cheesecake.
- Whipped coconut cream: For a dairy-free alternative that complements the cheesecake’s creamy texture, top with whipped coconut cream for added indulgence.
Side Dishes
- Coffee or espresso: A cup of freshly brewed coffee or a shot of espresso pairs wonderfully with the rich flavors of the cheesecake, enhancing its overall taste experience.
- Chocolate sauce: Drizzling some warm chocolate sauce over each slice can create a decadent treat that’s hard to resist! Just make sure it’s dairy-free if you want to keep things vegan-friendly.
- Fruit salad: A light fruit salad made from seasonal fruits offers a refreshing contrast to the creamy cheesecake, making each bite delightful.
- Caramel sauce: If you’re craving something sweet, serve with homemade caramel sauce for an extra layer of flavor that complements the burnt edges perfectly.
Enjoy your delicious creation and happy baking!
Make Ahead and Storage
This Burnt Basque Cheesecake in a Loaf Pan is perfect for meal prep, allowing you to enjoy a delightful dessert whenever the craving strikes. Its rich flavors develop beautifully as it sits, making it a great make-ahead treat.
Storing Leftovers
- Allow the cheesecake to cool completely before refrigerating.
- Store any leftovers in an airtight container in the fridge for up to 5 days.
- If you used parchment paper, simply lift it out of the loaf pan for easier storage.
Freezing
- Wrap the cooled cheesecake tightly in plastic wrap or aluminum foil.
- Place it in a freezer-safe container or bag to prevent freezer burn.
- Freeze for up to 2 months for best quality.
Reheating
- For best results, thaw the cheesecake overnight in the refrigerator before serving.
- If you prefer it slightly warm, slice and microwave individual pieces for 10-15 seconds.
FAQs
Here are some common questions about making this delicious cheesecake.
Can I use a different pan for Burnt Basque Cheesecake?
While this recipe is designed for a loaf pan, you can use an 8-inch round cake pan. Just keep an eye on the baking time as it may vary slightly.
How do I know when my Burnt Basque Cheesecake in a Loaf Pan is done?
The top should be deeply golden brown, and the center should still jiggle slightly when you shake the pan. It will firm up as it cools!
What makes Basque cheesecake different from regular cheesecake?
Basque cheesecake has a unique burnt top, giving it a caramelized flavor and creamy texture throughout. The burnt exterior adds depth and character that sets it apart from traditional cheesecakes.
Can I add toppings to my Burnt Basque Cheesecake?
Absolutely! While it’s delicious on its own, you can serve it with fresh berries, whipped cream, or a drizzle of chocolate sauce for extra flair!
Final Thoughts
I hope you enjoy making this delightful Burnt Basque Cheesecake in a Loaf Pan as much as I do! It’s a special recipe that brings warmth and joy to any gathering or quiet evening at home. Don’t hesitate to share your experience or try out different toppings—it’s all about enjoying this creamy goodness your way. Happy baking!
Burnt Basque Cheesecake in a Loaf Pan

Indulge in the delightful world of desserts with our Burnt Basque Cheesecake in a Loaf Pan. This recipe combines a smooth, creamy texture with a beautifully caramelized top, making it both visually stunning and irresistibly delicious. Perfect for any occasion, from intimate dinners to casual weeknight treats, this cheesecake is easy to prepare with just a handful of ingredients. You’ll appreciate its simplicity and the joy it brings to gatherings or cozy evenings at home.
- Prep Time: 10 minutes
- Cook Time: 45 minutes
- Total Time: 55 minutes
- Yield: Serves approximately six slices 1x
- Category: Dessert
- Method: Baking
- Cuisine: European
Ingredients
- 1 1/2 cups cream cheese, softened
- 1/2 cup granulated sugar
- 2 large eggs
- 3/4 cup heavy cream
- 1/2 teaspoon vanilla extract
- 1/8 teaspoon salt
- 1 tablespoon all-purpose flour
Instructions
- Preheat oven to 400°F (200°C) and line your loaf pan with parchment paper.
- In a large mixing bowl, beat cream cheese and sugar until fluffy.
- Add eggs one at a time, mixing well after each addition.
- Pour in heavy cream, vanilla extract, and salt; mix until smooth.
- Gently fold in flour until just combined.
- Pour batter into the prepared loaf pan and tap gently to release air bubbles.
- Bake for 40–45 minutes until the top is golden brown and the center jiggles slightly.
- Allow cooling at room temperature before refrigerating for at least four hours.
Nutrition
- Serving Size: 1 slice (80g)
- Calories: 350
- Sugar: 22g
- Sodium: 279mg
- Fat: 28g
- Saturated Fat: 17g
- Unsaturated Fat: 10g
- Trans Fat: 0g
- Carbohydrates: 25g
- Fiber: <1g
- Protein: 5g
- Cholesterol: 132mg