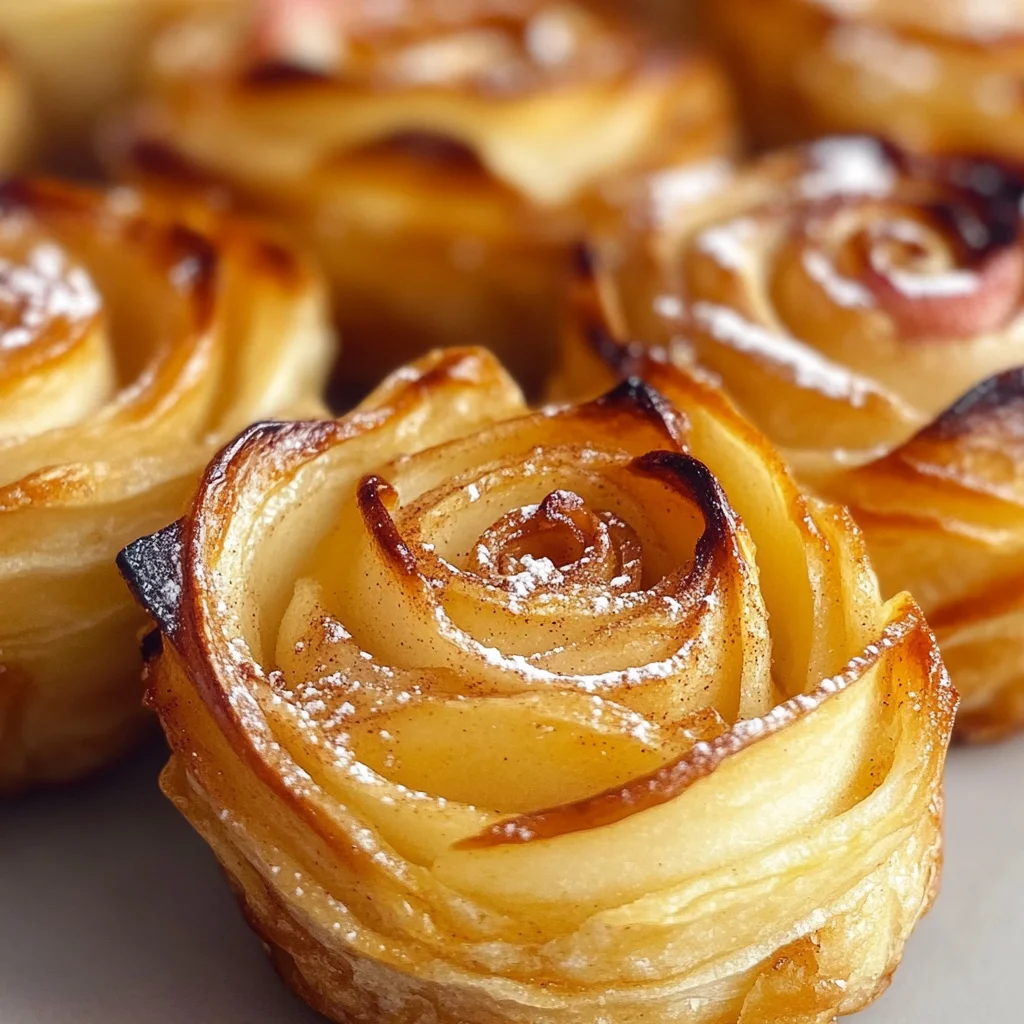
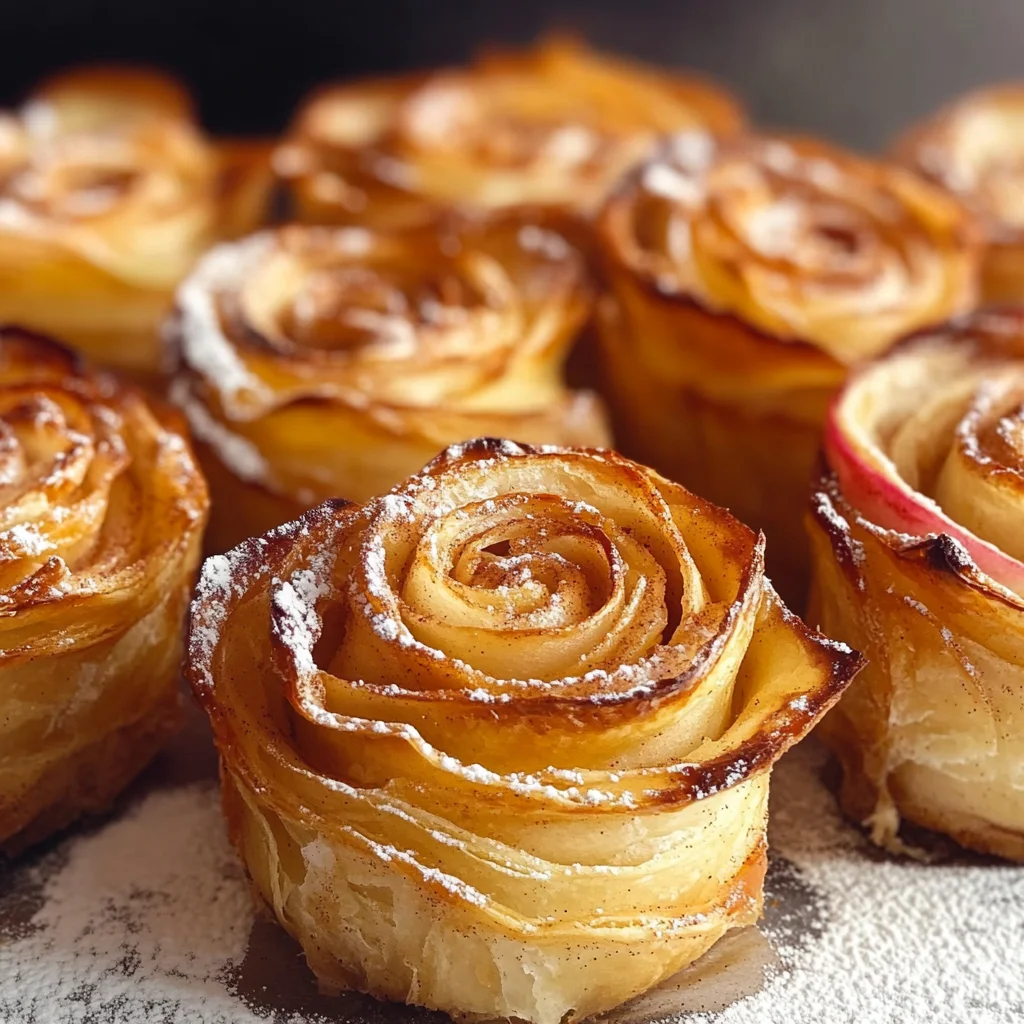
Baked Apple Roses With Puff Pastry
If you’re looking for a dazzling dessert that’s sure to impress, then look no further than these Baked Apple Roses With Puff Pastry! This delightful recipe combines the sweetness of tender apples with the flaky goodness of puff pastry, creating a treat that feels both fancy and comforting. I love making these for family gatherings or special occasions because they not only taste amazing but also look stunning on the table. Plus, they are surprisingly easy to whip up, making them perfect for busy weeknights or last-minute celebrations!
These apple roses are a wonderful way to bring a little elegance to your dessert game without all the fuss. Whether you’re hosting friends or just want to indulge in something sweet, this recipe is sure to become a favorite in your kitchen.
Why You’ll Love This Recipe
- Effortlessly Elegant: These Baked Apple Roses With Puff Pastry look like they came from a fancy bakery but are simple enough for home cooks at any level.
- Family-Friendly Fun: Kids will love helping to layer the apples and roll up the pastries. It’s a great way to get everyone involved in the kitchen!
- Make-Ahead Convenience: Prepare them ahead of time and pop them in the oven when guests arrive. You’ll have fresh-baked rose pastries without any last-minute stress.
- Deliciously Versatile: Enjoy them warm on their own or with a scoop of your favorite non-dairy ice cream. The choices are endless!
- Perfect for Any Occasion: From holiday dinners to casual get-togethers, these apple roses fit right in.
Ingredients You’ll Need
Let’s gather some simple and wholesome ingredients for these beautiful pastries! You probably already have most of them at home, making this recipe even easier.
For the Apple Filling
- 2 medium Apple
- 1 tbsp Lemon juice
For the Puff Pastry
- 1 Puff pastry sheet
- 3 tbsp Apricot preserve (or any other preserve)
- 2 tbsp Water
- Cinnamon (as needed)
Variations
This recipe is wonderfully flexible! Feel free to get creative with flavors and ingredients.
- Try Different Fruits: Swap out apples for pears or peaches for a unique twist.
- Change Up the Preserve: Use raspberry or strawberry preserves instead of apricot for a different flavor profile.
- Add Nuts or Spices: Sprinkle chopped nuts or spices like nutmeg into the filling for extra texture and warmth.
- Go Gluten-Free: Use gluten-free puff pastry if you need an alternative that fits your dietary needs.
How to Make Baked Apple Roses With Puff Pastry
Step 1: Prepare the Apples
Start by cutting each apple in half and removing the core. Lay each half flat on your work surface and slice thinly with a sharp knife. Thin slices are key here; they need to be flexible enough to curve into those lovely rose shapes!
Step 2: Soften the Apple Slices
Place your sliced apples into a microwave-safe bowl and add enough water to cover them. Don’t forget that splash of lemon juice—it helps prevent browning! Microwave on high for 3 to 4 minutes until they’re soft but not mushy. Softening makes it easier to shape those gorgeous apple roses later on.
Step 3: Thaw and Roll Out Puff Pastry
Thaw your puff pastry according to package instructions. Once thawed, roll it out until it’s about 18 inches long. This gives you plenty of space to create those beautiful layers!
Step 4: Cut Puff Pastry Strips
Using a sharp knife or pizza cutter, cut your rolled-out puff pastry into 6 equal strips. These will be your canvas for layering those apple slices!
Step 5: Mix Apricot Preserve
In a small bowl, mix together apricot preserve with 2 tablespoons of water until smooth. This sweet mixture will help keep everything moist while adding flavor.
Step 6: Assemble Your Rose Pastries
Take one pastry strip at a time and spread a thin layer of the apricot preserve mixture across it. Next, lay several softened apple slices along one edge of the strip, ensuring that the skin side is facing outward—this is what creates that beautiful rose appearance!
Step 7: Add Cinnamon & Fold
Dust the layered apples with cinnamon before folding over the pastry strip so that it hugs those lovely apple slices.
Step 8: Roll It Up
Starting from one end, gently roll up your pastry strip jelly-roll style. Remember not to roll too tightly; you want your pastries to expand beautifully while baking.
Step 9: Place in Muffin Tin
Carefully place each rolled pastry into a well-greased muffin tin. This helps maintain their shape as they bake while giving them those charming rose-like edges.
Step 10: Bake
Preheat your oven to 375°F (190°C) and bake these beauties for about 25-35 minutes until golden brown and flaky. The aroma will be irresistible!
Step 11: Cool & Serve
Once baked, let them rest in the pan for about 5 minutes before gently removing them. Dust with powdered sugar before serving—this makes them look even more inviting! Enjoy as is or with some ice cream on top!
Now you have everything you need to impress friends and family with these stunning Baked Apple Roses With Puff Pastry! Happy baking!
Pro Tips for Making Baked Apple Roses With Puff Pastry
Creating these delightful apple roses is not only fun but also a great way to impress your friends and family! Here are some pro tips to ensure your baked apple roses turn out perfectly every time.
- Choose the right apples – Opt for apples that are firm and slightly tart, like Granny Smith or Honeycrisp. They hold their shape during baking while providing a nice contrast to the sweetness of the pastry.
- Keep the puff pastry cold – Working with cold puff pastry makes it easier to handle and ensures it puffs up beautifully in the oven. If it starts getting warm, pop it back in the fridge for a few minutes.
- Slice apples thinly – The thinner the slices, the better they will bend and create that rose shape. Aim for about 1/8 inch thick; this will help them cook evenly and look stunning.
- Dust with sugar before baking – A light sprinkle of sugar over the top of your rolled pastries can enhance caramelization and add an extra touch of sweetness that complements the apples.
- Experiment with preserves – While apricot is delicious, don’t hesitate to try other fruit preserves like raspberry or peach for a different flavor profile. Each will bring its unique taste to your apple roses!
How to Serve Baked Apple Roses With Puff Pastry
Serving these lovely baked apple roses can be as creative as making them! Their elegant appearance makes them perfect for any occasion, from casual gatherings to festive celebrations.
Garnishes
- Powdered Sugar: A light dusting of powdered sugar adds a beautiful finish and enhances the sweetness.
- Fresh Mint Leaves: A couple of mint leaves on the plate bring a pop of color and a refreshing contrast.
- Whipped Coconut Cream: For a dairy-free option, serve with whipped coconut cream for added richness without animal products.
Side Dishes
- Vanilla Ice Cream: The classic pairing! The creamy texture balances out the warmth of the baked apple roses perfectly.
- Caramel Sauce: Drizzling some dairy-free caramel sauce over your apple roses can elevate their presentation and flavor profile.
- Mixed Green Salad: A fresh salad can provide a lovely contrast to the sweetness of dessert. Consider tossing together arugula, walnuts, and cranberries with a light vinaigrette.
- Cinnamon Oatmeal: Serve alongside a warm bowl of cinnamon oatmeal for a comforting breakfast twist!
With these serving suggestions, your Baked Apple Roses With Puff Pastry will not only taste delightful but also make for an impressive presentation at any gathering. Enjoy every bite!
Make Ahead and Storage
These Baked Apple Roses With Puff Pastry are not only a delightful treat but also perfect for meal prep! You can make them ahead of time and enjoy their scrumptious flavor any day of the week.
Storing Leftovers
- Allow the baked apple roses to cool completely before storing.
- Place them in an airtight container in the refrigerator.
- They can be stored for up to 3 days.
Freezing
- To freeze, ensure the apple roses are fully cooled.
- Wrap each rose tightly in plastic wrap or aluminum foil.
- Place them in a freezer-safe bag or container. They will keep well for up to 2 months.
Reheating
- For best results, reheat from frozen or chilled in a preheated oven at 350°F (175°C) for about 10-15 minutes.
- You can also microwave for about 30 seconds to 1 minute if you’re short on time, but this may make the pastry less crispy.
FAQs
Here are some common questions about making Baked Apple Roses With Puff Pastry!
Can I use different types of apples for the baked apple roses?
Absolutely! While Granny Smith apples offer a tartness that pairs beautifully with sweet preserves, you can experiment with your favorite varieties like Honeycrisp or Fuji for a sweeter flavor.
How do I make Baked Apple Roses With Puff Pastry look more elegant?
You can dust them with powdered sugar just before serving or drizzle a simple glaze made from powdered sugar and lemon juice over the top. This adds a touch of sweetness and sophistication!
Can I prepare the puff pastry ahead of time?
Yes! You can thaw and roll out the puff pastry ahead of time. Just be sure to keep it covered to prevent it from drying out until you’re ready to assemble your apple roses.
What should I serve with Baked Apple Roses With Puff Pastry?
These lovely pastries pair wonderfully with vanilla ice cream or whipped coconut cream, creating a delightful dessert experience that everyone will love.
How long do Baked Apple Roses last after baking?
Once baked, they will stay fresh in an airtight container in the fridge for up to 3 days. If frozen, they can last up to 2 months!
Final Thoughts
I hope this recipe brings joy and warmth to your kitchen! These Baked Apple Roses With Puff Pastry are not just visually stunning but also deliciously satisfying—a perfect way to impress friends and family during any gathering. Wishing you all the best as you create these delightful treats; I can’t wait for you to try them!
Baked Apple Roses With Puff Pastry

Indulge in the elegance of Baked Apple Roses With Puff Pastry, a stunning dessert that combines the natural sweetness of fresh apples with flaky, buttery pastry. These charming apple rose pastries are not only visually appealing but also simple to prepare, making them perfect for family gatherings or last-minute celebrations. Your guests will be captivated by their beautiful presentation and delightful taste, while you enjoy an effortless baking experience. Serve them warm with a drizzle of dairy-free caramel or a scoop of non-dairy ice cream for an unforgettable treat that’s sure to impress.
- Prep Time: 15 minutes
- Cook Time: 30 minutes
- Total Time: 45 minutes
- Yield: Makes approximately 6 servings 1x
- Category: Dessert
- Method: Baking
- Cuisine: American
Ingredients
- 2 medium apples
- 1 tbsp lemon juice
- 1 puff pastry sheet
- 3 tbsp apricot preserve (or any other preserve)
- 2 tbsp water
- Cinnamon (to taste)
Instructions
- Preheat oven to 375°F (190°C).
- Slice apples in half, core them, and cut into thin slices. Soak in water with lemon juice and microwave for 3-4 minutes until softened.
- Thaw and roll out the puff pastry into a large rectangle; cut into six strips.
- Mix apricot preserve and water, then spread over each pastry strip.
- Layer apple slices along one edge with skins facing out; sprinkle cinnamon.
- Fold pastry over apples and roll up gently.
- Place in a greased muffin tin and bake for 25-35 minutes until golden.
Nutrition
- Serving Size: 1 serving
- Calories: 150
- Sugar: 10g
- Sodium: 40mg
- Fat: 7g
- Saturated Fat: 3g
- Unsaturated Fat: 4g
- Trans Fat: 0g
- Carbohydrates: 21g
- Fiber: 1g
- Protein: 1g
- Cholesterol: 0mg