Garlic Bread Rolls
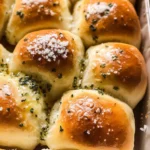
If you’re looking for the perfect addition to your dinner table, these Garlic Bread Rolls are just what you need! Soft, fluffy, and bursting with garlic goodness, they are a delightful treat that can elevate any meal. Whether you’re hosting a family gathering or simply enjoying a busy weeknight dinner, these rolls are sure to impress everyone around the table. The best part? They’re so easy to make that you’ll find yourself whipping them up time and time again!
What makes these rolls special is not just their incredible flavor but also their warm, comforting aroma wafting through your kitchen as they bake. Trust me, once you try these Garlic Bread Rolls, they will become a beloved staple in your home!
Why You’ll Love This Recipe
- Easy to Make: With simple ingredients and straightforward steps, you’ll have fresh rolls ready in no time!
- Family-Friendly: Everyone loves garlic bread, and these rolls are perfect for both kids and adults.
- Make-Ahead Convenience: You can prepare the dough ahead of time, making it easier to serve warm rolls whenever you need them.
- Delicious Flavor: The combination of fresh garlic and herb butter creates a mouthwatering flavor that will leave everyone wanting more!
- Versatile Side Dish: Perfect with pasta dishes, soups, or as a standalone snack – the options are endless!

Ingredients You’ll Need
To make these delightful Garlic Bread Rolls, you’ll only need some simple and wholesome ingredients that you might already have at home. Each element plays an important role in creating those soft and flavorful rolls we all crave.
For the Dough
- 4 1/2 tablespoons unsalted butter
- 2 tablespoons minced garlic
- 3 1/2 cups + 1 tablespoon all-purpose flour (See notes below for measuring)
- 3 tablespoons chopped fresh parsley
- 1 tablespoon granulated sugar
- 2 1/4 teaspoons instant yeast
- 1 teaspoon fine sea salt
- 1 cup whole or 2% milk (warmed to 110°F)
- 1 large egg (room temperature)
For the Topping
- 1 beaten egg (for brushing the tops)
- 2 tablespoons unsalted butter
- 1 tablespoon minced garlic
- 1 tablespoon chopped fresh parsley
- Flaky sea salt (for finishing)
Variations
This recipe is wonderfully flexible! You can easily customize it to suit your taste or what you have on hand. Here are a few ideas:
- Add Cheese: Mix in some shredded mozzarella or parmesan into the dough for an extra cheesy delight.
- Herb Infusion: Experiment with different herbs like rosemary or thyme for a unique twist on flavor.
- Spicy Kick: Add a pinch of red pepper flakes to the garlic butter for those who love a bit of heat.
- Stuffed Rolls: Try adding small pieces of roasted vegetables or sun-dried tomatoes inside each roll before baking.
How to Make Garlic Bread Rolls
Step 1: Prepare Your Baking Pan
Start by lightly buttering the bottom and sides of a 9×13 pan. This step is essential as it prevents the rolls from sticking later on. A well-prepped pan ensures that when they’re baked to perfection, they’ll slide out easily for serving.
Step 2: Make the Garlic Butter Mixture
In a small pot over low heat, melt the unsalted butter and add the minced garlic. Cook this mixture for about 1-2 minutes until fragrant. This process not only infuses the butter with delicious garlic flavor but also sets up a wonderful base for your dough. Let it cool while you measure out your other ingredients.
Step 3: Combine Dry Ingredients
In your stand mixer bowl, mix together the flour, parsley, sugar, yeast, and salt. This step helps distribute all the dry ingredients evenly so every roll gets that delightful garlic-infused goodness. Once combined, add in the warmed milk, egg, and cooled garlic butter mixture.
Step 4: Knead Your Dough
Using the dough hook attachment on low speed, knead until smooth and slightly tacky—this should take about 10-12 minutes. If at any point your dough feels overly sticky, don’t hesitate to sprinkle in more flour one tablespoon at a time until it reaches a workable consistency.
Step 5: Shape Your Rolls
Once kneaded, cut your dough into 12 equal portions—aiming for about 67 grams each if you’re using a scale. Shape each piece into a ball by pinching the bottom seam closed tightly. This technique helps keep them nice and round during rising. Place them into your prepared pan in rows.
Step 6: Let Them Rise
Cover your pan with plastic wrap or a clean kitchen towel and place it in a warm area to rise until doubled in size—this usually takes about 1-2 hours. Watching them grow is one of my favorite parts; it’s like magic happening right before your eyes!
Step 7: Bake Those Rolls!
Preheat your oven to 350°F (180°C). Brush the tops of your risen rolls with beaten egg wash for that beautiful golden color when baked. Pop them into the oven for about 20-30 minutes until they’re golden brown on top—your kitchen will smell heavenly!
Step 8: Brush with Garlic Butter
While those delicious rolls are baking away, prepare fresh garlic butter by melting more unsalted butter in a pot and adding minced garlic again. After cooking this mixture briefly until fragrant (just like before), remove from heat and stir in parsley.
Once your rolls are out of the oven—don’t wait too long! Brush them generously with that aromatic garlic butter while they’re still warm so each bite is packed with flavor. Finish off with flaky sea salt if desired before serving warm!
And there you have it—delightful Garlic Bread Rolls ready to accompany any meal! Enjoy sharing them with friends and family; I promise they’ll be asking for seconds!
Pro Tips for Making Garlic Bread Rolls
Making garlic bread rolls can be a delightful experience, and with these tips, you’ll ensure they turn out perfectly every time!
- Use fresh ingredients: Fresh garlic and herbs can dramatically enhance the flavor of your rolls. Dried ingredients lack the same punch and aroma.
- Knead the dough properly: Kneading is essential for developing gluten, which gives your rolls their fluffy texture. Make sure you knead until the dough is smooth and slightly tacky.
- Watch the rise times: Dough rises best in a warm environment. If your kitchen is cool, consider placing the dough near a warm oven or in a sunny spot to help it rise effectively.
- Monitor baking closely: Ovens can vary in temperature. Start checking your rolls around 20 minutes to ensure they don’t over-bake. You want that lovely golden color without burning.
- Brush immediately after baking: Brushing the rolls with garlic butter while they’re still hot allows for better absorption, resulting in more flavorful rolls!
How to Serve Garlic Bread Rolls
Garlic bread rolls are wonderfully versatile and can be served in numerous ways. Here are some ideas to present this delicious dish at your next meal!
Garnishes
- Chopped fresh parsley: Sprinkling fresh parsley not only adds color but also enhances the herbaceous flavor of the rolls.
- Grated Parmesan cheese (non-dairy option): For those who enjoy cheesy flavors, adding a sprinkle of non-dairy grated cheese on top before serving can create an irresistible treat.
Side Dishes
- Mixed Green Salad: A fresh salad with a light vinaigrette complements the rich flavors of garlic bread rolls and balances out the meal.
- Roasted Vegetables: Seasonal roasted vegetables add both color and nutrition to your table while providing a nice contrast to the soft texture of the rolls.
- Pasta Primavera: A light pasta dish loaded with vegetables makes for a hearty main course that pairs beautifully with garlicky goodness.
- Soup: Whether it’s a creamy tomato bisque or vegetable soup, these rolls serve as the perfect accompaniment for dipping!
With these serving suggestions, your garlic bread rolls will shine as a highlight at any gathering! Enjoy every bite!

Make Ahead and Storage
These garlic bread rolls are perfect for meal prep! You can easily make them in advance, store, and enjoy them later. Here’s how to keep those delicious rolls fresh:
Storing Leftovers
- Place cooled rolls in an airtight container at room temperature for up to 2 days.
- If you have more than you can eat in that time, transfer them to the refrigerator for up to a week.
Freezing
- Allow the rolls to cool completely before freezing.
- Wrap each roll tightly in plastic wrap and place them in a freezer-safe bag or container.
- They can be frozen for up to 3 months. Just remember to label the bag with the date!
Reheating
- To reheat from the refrigerator, simply warm them in a preheated oven at 350°F (175°C) for about 10 minutes.
- If reheating frozen rolls, let them thaw overnight in the fridge before warming or bake directly from frozen for about 15-20 minutes until heated through.
FAQs
Here are some common questions you may have about making garlic bread rolls.
Can I use whole wheat flour instead of all-purpose flour for garlic bread rolls?
You can substitute part of the all-purpose flour with whole wheat flour, but be aware that it may change the texture slightly. Start by replacing half of it for a healthier option while maintaining fluffiness.
What if I don’t have fresh garlic?
If fresh garlic isn’t available, you can use garlic powder as a substitute. Use about 1/8 teaspoon of garlic powder per clove of garlic needed. However, fresh garlic provides a richer flavor!
How do I make Garlic Bread Rolls ahead of time?
You can prepare the dough and shape it into rolls, then cover and refrigerate overnight. The next day, let them rise before baking, so they’re freshly baked when you need them!
Are Garlic Bread Rolls suitable for freezing?
Absolutely! These rolls freeze well. Just make sure they are fully cooled before wrapping and storing them in a freezer-safe bag or container.
How do I ensure my Garlic Bread Rolls are fluffy?
To achieve fluffy rolls, avoid over-kneading the dough and ensure it rises properly. Also, make sure your yeast is fresh and active!
Final Thoughts
I hope you find joy in making these delightful garlic bread rolls! They bring warmth to any meal with their soft texture and savory flavor that pairs perfectly with everything from soups to salads. Enjoy sharing (or indulging) these treats at your dinner table—your family will thank you! Happy baking!
Garlic Bread Rolls
Garlic Bread Rolls are the perfect addition to any meal, combining a soft, fluffy texture with a burst of savory garlic flavor. These rolls are easy to make and will fill your kitchen with a warm, inviting aroma. Whether you’re hosting a family dinner or enjoying a quiet weeknight meal, these rolls will impress everyone at the table. They can be made ahead of time for convenience, making them ideal for busy schedules. Once baked, these rolls are brushed with a rich garlic butter that enhances their scrumptious taste. Enjoy them as a side with pasta dishes, soups, or simply on their own for a delightful snack.
- Prep Time: 15 minutes
- Cook Time: 25 minutes
- Total Time: 40 minutes
- Yield: Makes 12 rolls 1x
- Category: Side Dish
- Method: Baking
- Cuisine: American
Ingredients
- 4 1/2 tablespoons unsalted butter
- 2 tablespoons minced garlic
- 3 1/2 cups all-purpose flour
- 1 tablespoon granulated sugar
- 2 1/4 teaspoons instant yeast
- 1 teaspoon fine sea salt
- 1 cup warmed milk
- 1 large egg (room temperature)
- Additional toppings: beaten egg, unsalted butter, minced garlic, chopped fresh parsley
Instructions
- Preheat your oven to 350°F (180°C) and lightly butter a 9×13 baking pan.
- Melt unsalted butter in a small pot over low heat; add minced garlic and cook briefly until fragrant. Let cool.
- In a stand mixer bowl, combine flour, sugar, yeast, salt, and parsley. Add warmed milk, egg, and cooled garlic butter mixture.
- Knead the dough using the dough hook until smooth and slightly tacky (about 10-12 minutes).
- Divide dough into 12 equal portions; shape into balls and place in the prepared pan.
- Cover and let rise in a warm area until doubled in size (about 1-2 hours).
- Brush tops with beaten egg wash and bake for 20-30 minutes until golden brown.
- Prepare additional garlic butter while baking; brush over warm rolls before serving.
Nutrition
- Serving Size: 1 roll (67g)
- Calories: 180
- Sugar: 1g
- Sodium: 210mg
- Fat: 7g
- Saturated Fat: 4g
- Unsaturated Fat: 3g
- Trans Fat: 0g
- Carbohydrates: 25g
- Fiber: 1g
- Protein: 4g
- Cholesterol: 30mg

